Available for Directors and Editors
For the publishing of digital signage slides, the content management page is the most important page in MediaMyne. Here is where the magic happens. After you have successfully logged in the MediaMyne CMS, by default this page is loaded. In this page, the following components can be found:
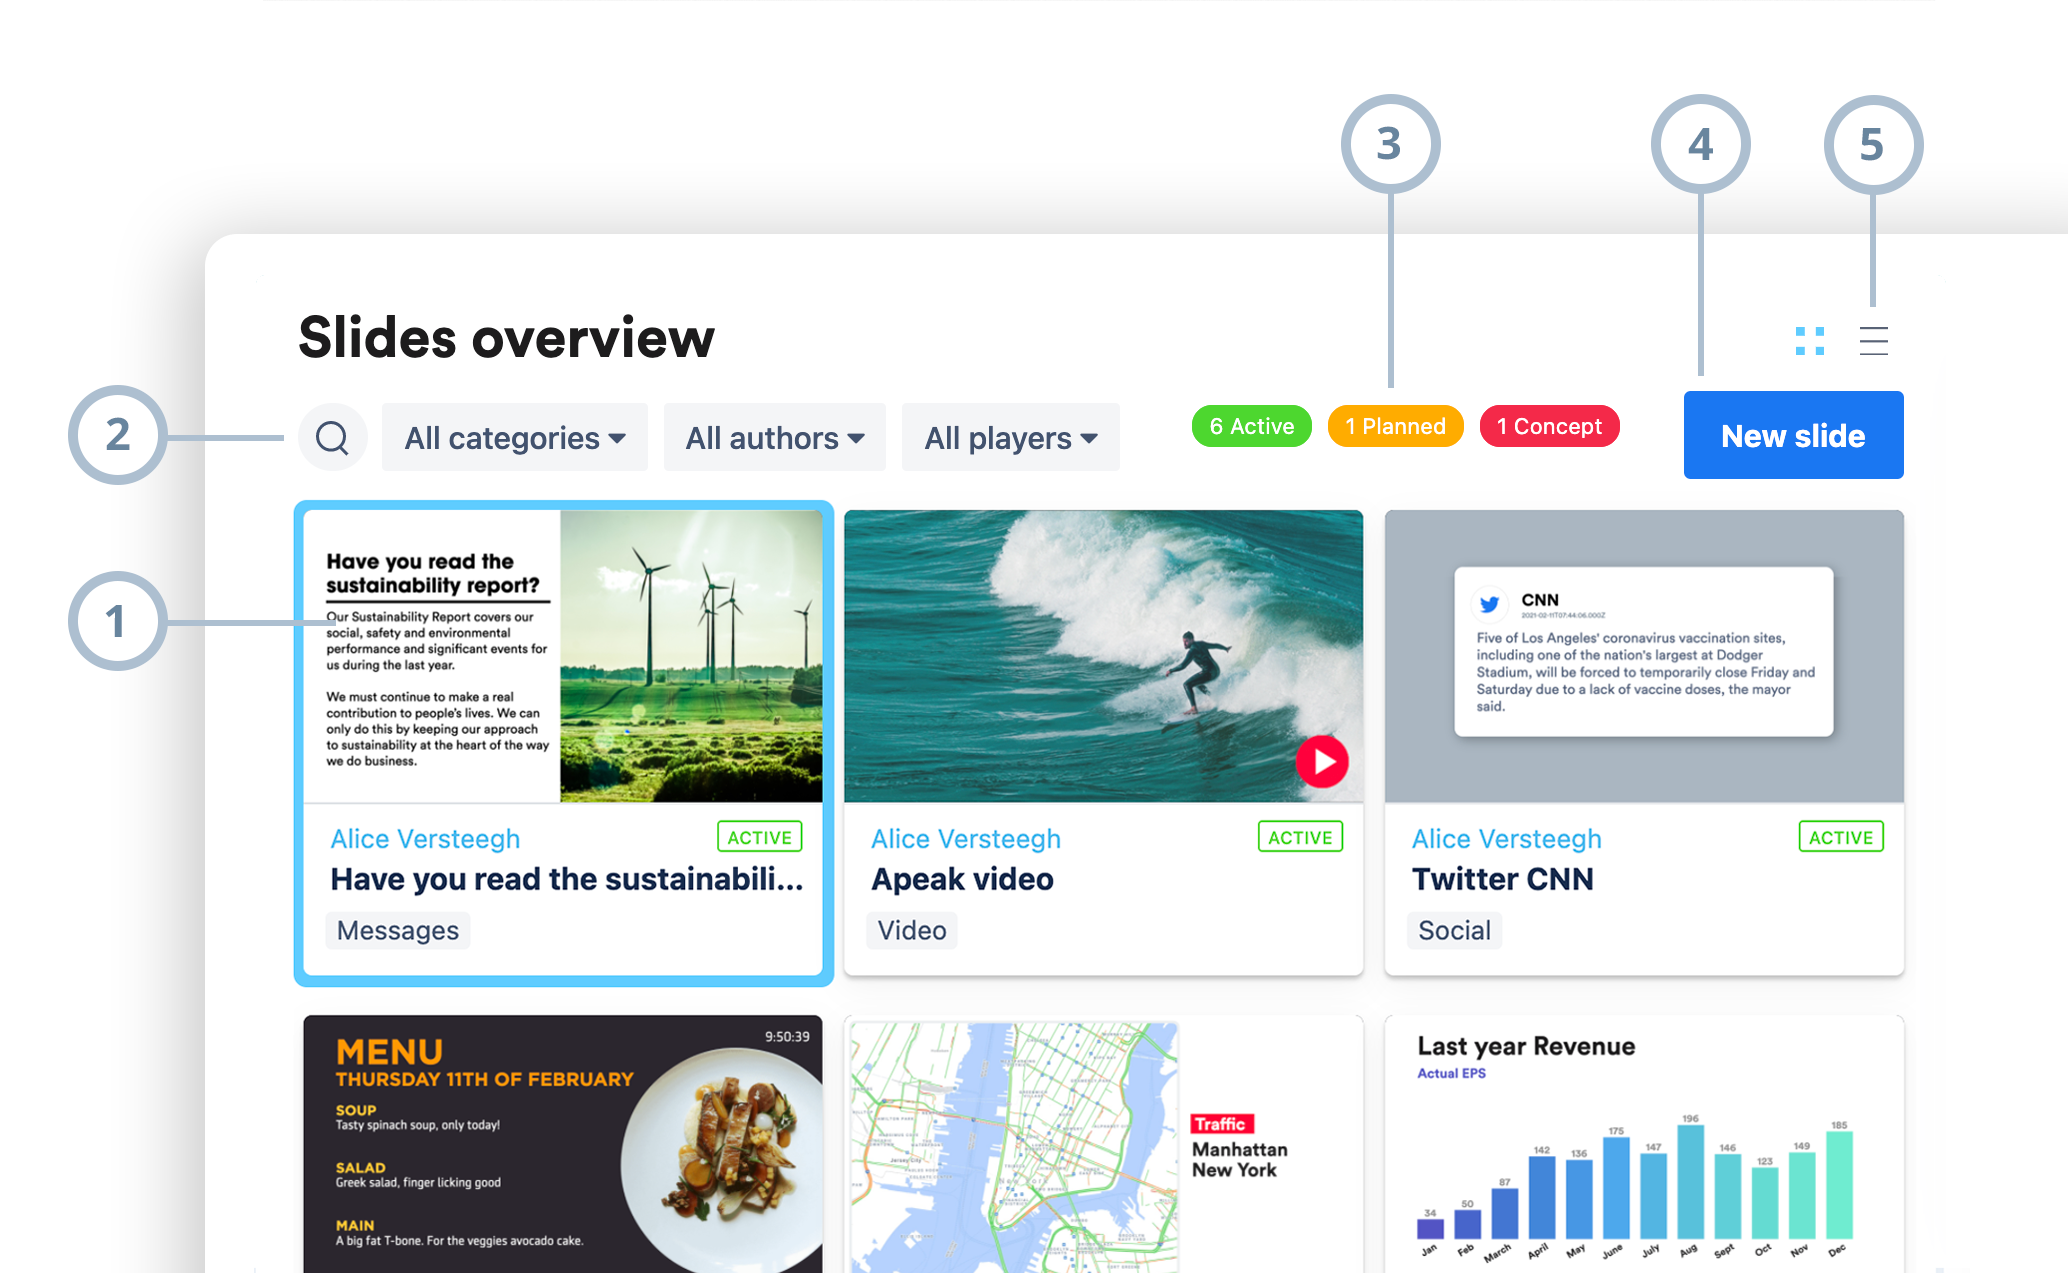
Slides in the overview
The slides in the slides overview show an exact example of the slide, a name, the original autor of the slide, the category the slide is saved in, and the status of the slide. In this example the 'view mode' of the overview is set to the the large slide examples.

Searching in the overview
Any input in the search-field will instantly activate the searching in the overview on the name (item 3 in the image above) of the slide, so there is no search on content-text. The search filtering can be done in combination with the other filters.
How to filter the overview
The slides overview can be filtered by category, author or player, and can be used combined. By default all filters are turned off, so all existing slides are shown.
Category filter
On top there is always the 'All categories' item 1 which is the default setting.
Here under all categories are listed containing at least 1 slide, the number of total slides are shown per category 2. If selected, the slides overview will be filtered on this category.
Categories not containing any slides, are listed at the bottom 3 and can not be selected.

Author filter
On top there is always the 'All authors' item 1 which is the default setting.
Here under all authors are listed who at least made 1 slide in the overview, with you as a user default on top of the list 2. If selected, the slides overview will only show slides made by this author.
If a user has made slides, but is for any reason deleted from MediaMyne, the deleted user will be marked in red 3.
If a deleted user did not have made any slides, they will be listed disabled at the bottom 4 and can not be selected.

Player filter
This filter makes it possible to see which slides are published on a certain player, giving a quick overview of 'what should be playing on player X'. It also gives a quick view on the number of slides published per player 1, where it is quickly noticeable if no content has been published on a player.
Players without any slides, are listed at the bottom 2 and can not be selected.

Filtering the overview by status
The green, yellow and red buttons allow the slides to be quickly filtered by their status. This is useful if, for example, you only want to see the active slides.

The number of slides per status is displayed here as well. If you uncheck a status, any slides with that status will no longer be shown in the overview and the overview will only consist of slides from the other two statuses. These status filters may be used in combination with the other filters and the search functionality.
Slides can be active, planned or in concept, and gives a quick insight if the slide should be on display.
active Active slides are published and currently displayed on at least 1 screen.
planned Planned slides are also published on 1 display or more, but will automatically be active in the future.
concept Concept slides are not published since the checkbox in Publication settings > Publish is turned off.
⚠︎ Active The slide would be active if the category was in an active playlist, this can be managed in the playlist page.
Processing Slides in processing status have video files that are being converted.
Viewmode of the overview
There are two possible view modes for the overview. The standard view is a list with a slide on each line. By clicking on one of the two upper right buttons, the view mode can be adjusted to an overview containing large examples. Just choose the mode you fancy, your last setting will be automatically saved. The selection has no effect on how the system works.
Slides from other users
Depending on the settings of the user, a user can view or edit slides created by other users. A Director has full access to all slides from all users, as do Editors who are in a user group. The screen selection, category selection, and template selection of someone else's slide can be edited, but only within the rights and authorisations of the original author.
Copy, archive or delete a slide
Slides can be deleted or archived individually. To do this, first hover one slide and click the '3-dots' button to make one of the selections to copy, archive or delete.

Copy of a slide
Any slide that is listed in the overview can be copied, even slides of other users. If copied, a slide is duplicated but changes can be made on everything related to content, template-selection or publication. This applies to slides copied from other users as well.
When copied, the new slide will only inherited the content of the slide, so the text, images or video. The publication settings will be the default settings as if a new slide is made, all within your own authorizations regards player-selection and categories.
If the original slide was made in a template you as a user are not authorized to use, MediaMyne will ask you to select an alternative template before the new copy can be published. After copying a slide there is by no means a relation between the original and the copied version, both are slides like any other.
Archive or delete multiple slides at once
To speed up the process, multiple slides can be selected to archive or delete at once. To do this, first hover one slide and select the checkbox in the left-top corner. If checked, the multi-select is activated and all other slides can be selected now. At the bottom of the page a bar appears with the possibilities to delete or archive all selected slides.
💡 MediaMyne tip:
Since the deletion of a slide is permanent and can no longer be reverted, we recommend that you archive slides if they are no longer relevant. In this way, a slide can be retrieved and used at a later time.

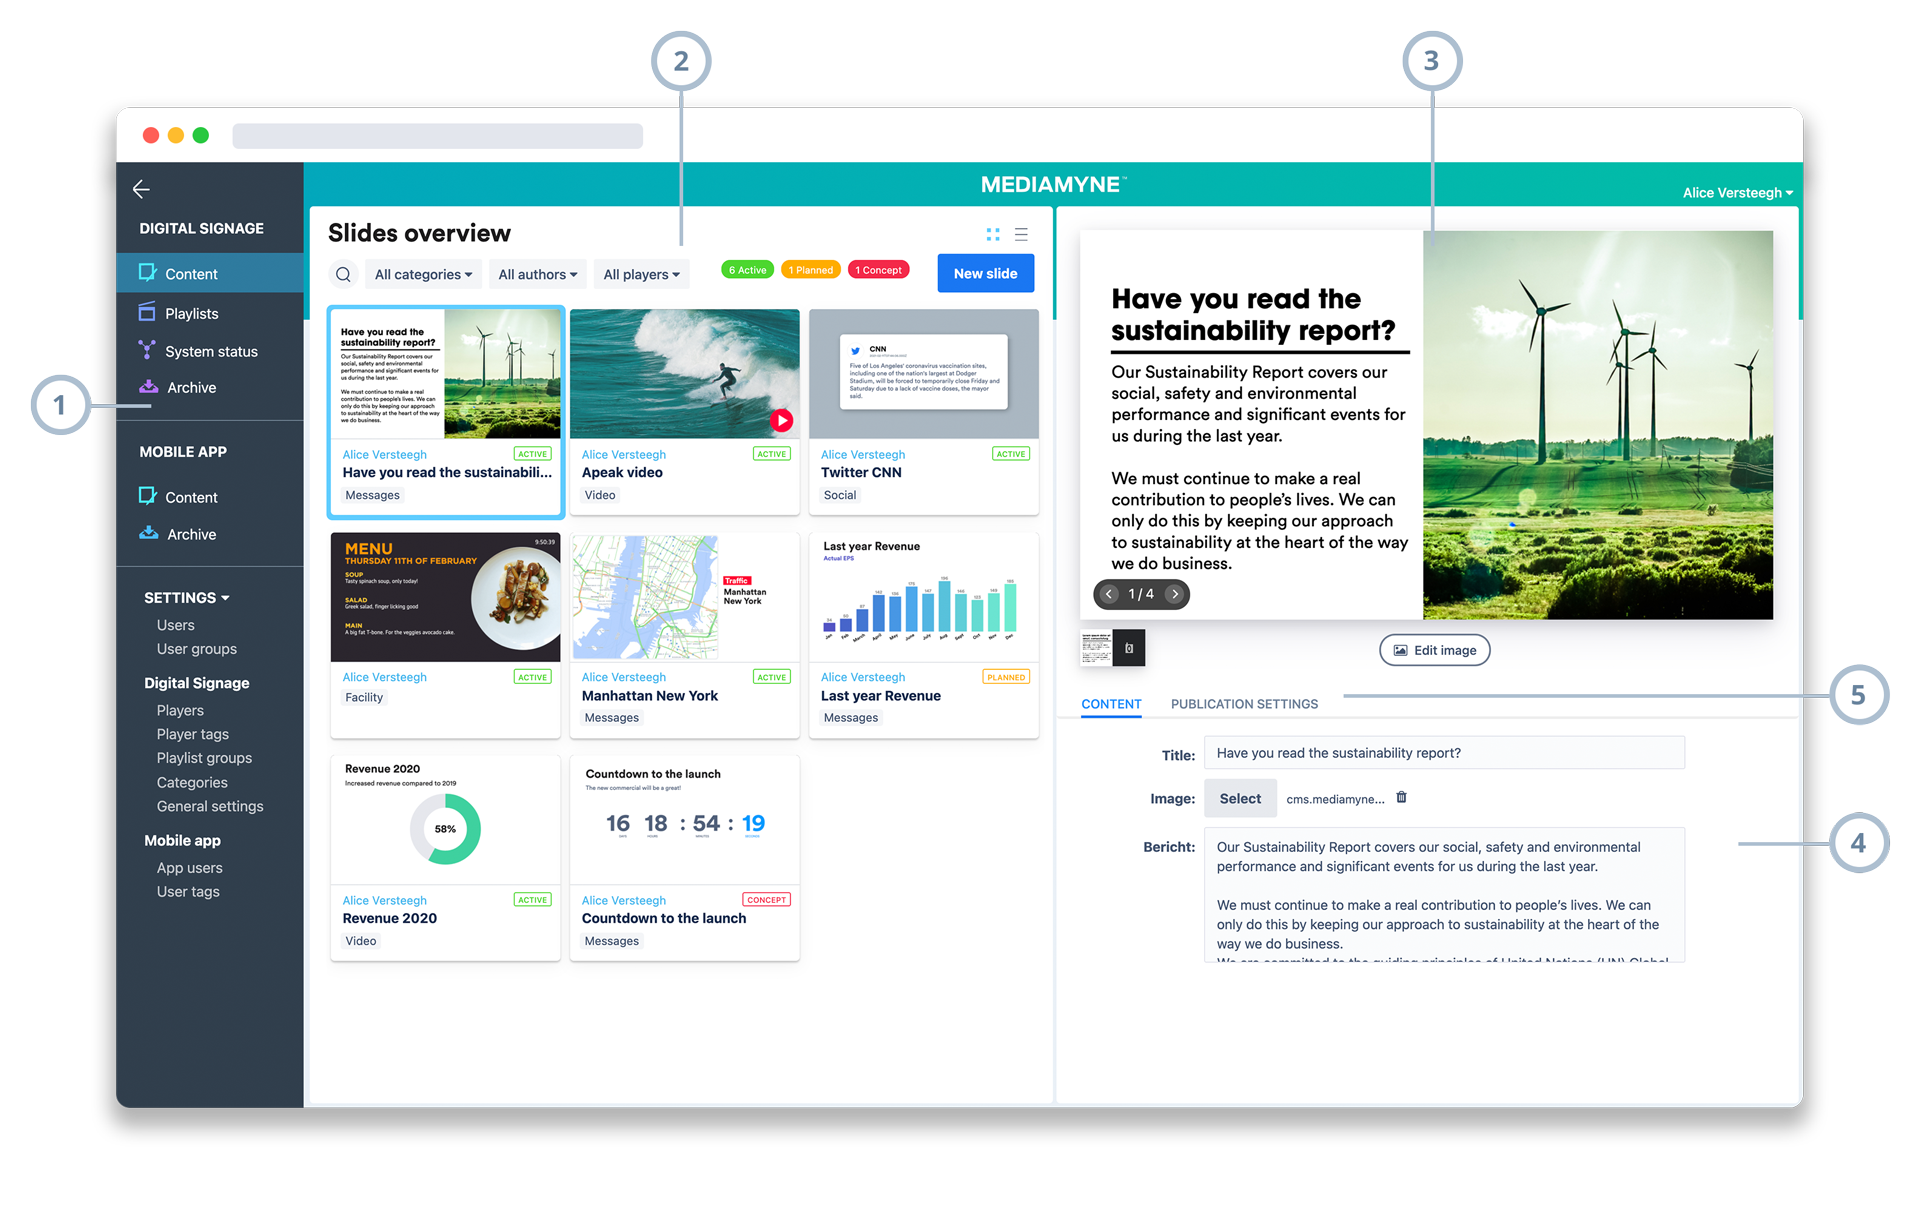
In this area the selected slide can be seen as it will appear on the displays. It will show the selected template with inserted text, images or video. Text as well as images are directly visible when entered since the preview is updated instantly on user entry. For some templates the animations are played when clicked on the preview.
Slide preview
To know how the slide will exactly appear on the screen, the preview gives an exact example. All entered content, such as text and images is instantly visible. By clicking on the preview, build in animations are played.
Text navigation
If a slide contain more text then can be shown at once, in the left-bottom corner buttons will appear to navigate through the full length of the text.
If shown on a display, the player will scroll automatically through the text, with the set duration for the slide per page each. So if a slide is set to 10 seconds, but the text covers 3 pages, the total duration of the slide will be 30 seconds.
Template change
If you are making a new slide, the first thing to do is selecting a template, it is however possible to change the chosen template at any time. To do so, click on the little template-image 3 and a dialog will appear. Double-click to select and the new template will be applied to the slide instantly.
Depending on the type of template and the input fields available, all possible content will be transferred to the new template. But if, for instance, a slide with an image is changed into a video-template, the image will not be loaded into this new template. Content in the form of text will transferred to input fields with the same label-name, so all text found in field 'Text' will come back if this field exist in the new selected template.

In this area the content can be entered to make the slide. If a template is selected, all needed input fields for this template is listed and ready to be filled in. Many templates offer the option to add an image, some for video, and some just for text or data. If a template with image is selected, below the title-field an image-selection button 3 appears. But when the template offers the option to apply video, this button reads 'Video' instead. As in the example here above, the field 'Text' is found on many templates. However, select-fields for colors, sliders for position, date-pickers for countdowns can be found here as well.

The second menu item Publication settings allows you to indicate on which screens you would like the slide to be displayed. You can also enter a period and select a playlist-category.
Player and category selection
The player selection dialog appears when you click the 'On players' button. Here you can select on which players a specific slide should be published, and select the playlist category in where to save the slide in.

Filtering applies to all filters. For example, if the filters ‘Atlanta’ and ‘Warehouse’ are selected, the player list will only show players at Atlanta warehouses. You can then check and uncheck players in the list of players on the right, thereby indicating whether you would like the slide to be published on a screen.
Category selection is located on the left of the dialog. A category is placed in the playlist and played on the screen. Depending on the authorization, categories for this screen can be created and added to the playlist by the same user. However, a limited number of categories is sufficient and the list can remain unchanged for longer periods of time. For the users with limited rights, the Editors, the categories can be managed through the application settings by the administrator. When making a new slide, the category in the top of the list is selected as a standard.
Publication
By entering a start date and an enddate, you can determine the period during which a certain slide is displayed on the selected screens. A slide without a start and end date will be displayed immediately and for an indefinite period of time. A slide with only an end date listed will be displayed immediately and expire at said date and time.

The time can be set in both hours 1 as well as minutes 2 in the same date-picker.
Weekplanner
With the weekplanner it is possible to publish the slide repeated per week-day in a selected time-span. So for example to make the slide published only on Monday and Tuesday from 9:00 till 11:00 AM, every week. Can be used in combination with the publication start- and enddate, this means that this recurring publication falls within the publication period.
Duration
The duration indicates the number of seconds that a certain slide is displayed. The default setting is 14 seconds but can be adjusted for each slide. When a video template is used, the duration setting cannot be applied, as the duration is determined by the length of the video. The duration applies to each page separately, so if a slide is set to 10 seconds, but the text covers 3 pages, the total duration of the slide will be 30 seconds.
Name
The name of the slide is visible within the CMS and is only intended to assign the slide a distinctive feature. The name shall never appear on a slide. The name of the slide appears on the slide overview and can be found using the search tool. The name of the slide will automatically be generated based on the title of the slide. You can change the name of the slide without changing the title.
Publish
By checking Publish, you indicate that you would like the slide to be published. This does not mean a slide is automatically included on an active playlist. If Publish is not checked, the slide will be saved in concept as draft for later publication.
Save and Publish
A slide can be saved or published immediately. Depending on whether Publish is checked, the green button under the slide example serves as a publish button, otherwise as a save button. If the slide is saved, it will be saved as a concept. A slide can always be edited and published at a later date.
Any slides that have already been created appear on your overview after login. If no slides have been created yet, a big blue button will appear that can be used to create the first slide. If slides already exist, a new slide can be made by the blue button 'New slide' above the slides overview. If clicked, an overview of all available templates will appear to choose from. By double clicking on the template you require, the template is selected and you can start adding content right away.

Adding content
Content can be added as text, images or video. Certain templates may only include a title and text, but other templates may include various input fields which allow text to be placed alongside an image. Any text added to an input field will immediately show up on the preview. A maximum number of characters is defined for each input field. The font type and size is preset within the template and cannot be modified. Options for content entry may vary between templates due to their functionality.
Adding images
Many templates offer the option to add an image, these can be identified by the camera symbol in the example. The dark image box indicates the area in which an image will be displayed. Images may be added to text or can be used to be displayed full screen.

After selecting a template, you can use the image-selection button to select images from the network or your local hard drive, these images maybe in .jpg, .png or .gif format. After you select your image, it will immediately show up on the template. The image will be shown in the image box in full and the slide can now be saved.
Image editing
If you are not satisfied with the position or zoom-factor of the image, you can use the image editing tool, which is activated by clicking the 'Edit image' button. In this dialog the original imagefile is shown, and the slider allows you to adjust the size of the image, the mouse can also be used to drag the image to its correct position.
An animated gif will be displayed as a static image and will therefore not be animated. The playback of animated gif files is planned in near future developments of MediaMyne.
Adding video
Some templates allow video files to be added, these can be identified by the movie camera symbol. Most video templates will show the video in fullscreen, however, in some cases the video is pictured in a small area with a text-block next to it, this will be indicated in the template example.

If available in the template, you can use the video-selection button to select video files from the network or your local hard drive. MediaMyne accepts all existing video file formats, such as .mp4, .mov, .wmv, .avi,.flv, .f4v, .ogg, .m4v, but also other formats can be uploaded.
After uploading the file, you can save the slide. The video file will then automatically be converted, and the slide will become available after the conversion is completed. The time it takes to convert a file depends on the file size and length of the video but will be between 1 and 5 minutes. The status of the upload is shown on the slide overview. During the conversion, the slide status is on processing. If required, you can logout the system without disturbing the process. The slide with video will appear on the addressed displays automatically.

The player always plays the video files in full length. Therefore, the option to set the duration in the publication settings is disabled if a video-templates is selected. When the upload and conversion of a video is done, an example of the video is visible in the slides overview. The video can be played back in the preview through the video controls visible in the template.
Available for Directors and Editors
The player preview can be opened through the main menu. This screen shows a preview for each player by simply clicking on one of the players on the left side of the screen. A preview of this player will then appear on the right.

Available for Directors only
In the content management page is decided which content is published, how it looks, and when and where the content is published. In the playlist page, basically is decided how often this content is shown compared to each other, and in which order.
Just as like making a movie, also here the Directors are the ones that make the decisions and are the only users authorized to do so. In this page, the following components can be found:

What is a playlist
A playlist is a collection of categories and apps played by the player. The player displays the categories and apps in the playlist in the order as listed, from top left to bottom right. The player shows one slide from each category at a time and then goes on to the next category. A slide must be addressed to a specific player, otherwise the slide is skipped and the next slide from that category displayed. When an app comes up, for instance the news app, just one news message is displayed. The player then automatically moves on to the next category of the module. Some modules, such as the weather forecast, contain the same content for each display.
Making a playlist
On the bottom left, the button Edit Playlists can be used to create a new playlist. After adding the name and saving the playlist, you can easily drag categories or apps to the playlist field. The items can be changed within the playlist at a later stage. You can delete an item by dragging the icons out from the playlist field. All playlists can directly be selected in the list on the left 1 and playlist can be made, renamed or deleted using the button Edit playlist 4.
A player will only display the categories listed in the linked playlist. In other words, slides saved in category 'Messages' and addressed to player 'Office', will only be displayed on player 'Office' if category 'Messages' is placed into the playlist of the player 'Office'.
Categories
The main categories include two types: slides created in the content screen and apps with automatically generated content such as news and weather. Slides created by Directors are found under 'My content' and slides made by Editors are found under the obvious 'Editor content'. The apps can be found under the main categories, this includes various types of content which are constantly updated with external content, such as news and weather reports.
💡 MediaMyne tip:
The apps provided by MediaMyne are self-sufficient since they retrieve their own daily fresh data to show. News and weather are basic needs for viewers and, when applied with the correct dosage, gives a guaranteed variety to your presentation. Besides, in the odd case there are no active slides available, the show still goes on.
Connecting playlists to players
Before a playlist can be played on a player, one or more playlist groups must be created within the MediaMyne settings. Playlist groups are groups to which certain players and certain playlists are linked. This way, the playlist is connected to all players in the group and all players in a group display the same playlist. When a playlist is connected to at least one playlist group, the playlist will have an active status. The playlist-groups button 6 activates the playlist activation dialog. If clicked, the playlist groups dialog box will appear.

In this dialog you can select the right playlists to to specific playlist groups. For instance, when 'Boston playlist' is connected to 'Boston group', all players included in 'Boston group' will display 'Boston playlist'. Please see the schematic view here below:

Available for Directors and Editors
The archive contains all slides which were manually moved to the archive as well as slides which were automatically stored after expiration. An expired slide is a slide for which the publication date has passed. Slides in the archive can either be stored there, deleted permanently or retrieved to the active slide overview.
The archive overview can be used to indicate for each slide whether it is to be retrieved or deleted. After selecting the required slides, the options to delete and retrieve appear at the bottom of the page. When a slide is retrieved, it will appear in the active slides overview in concept , with all original settings restored, except for the publication dates. The slide is now ready to be published again.
To ensure yourself of a successful broadcast, the screens must be turned on and connected to the internet at all times. You can check the 'System status' in the main menu where an overview is provided of all screens within your account.
The status of your screens
This overview shows properly working screens in green and screens with technical problems in red. Screens indicated in red also list the start time of the problems which is the 'Last connection', this is the last moment that we got a sign from the player. The red and green buttons on the top right can be used to quickly filter the player statuses. These buttons also show the number of screens for each status.
Extra player information
In addition to these details, extra information is provided for troubleshooting, including the player operating system and available disk space, which is marked in red when critically under 1 Gb.