Only available for users with Administrator rights
Within the settings menu, all needed subjects are found to config MediaMyne to function within your organization. This concerns the management of CMS users, the activation of players, creating categories, playlist groups and locations, as well as the management of all connected users of the mobile app.
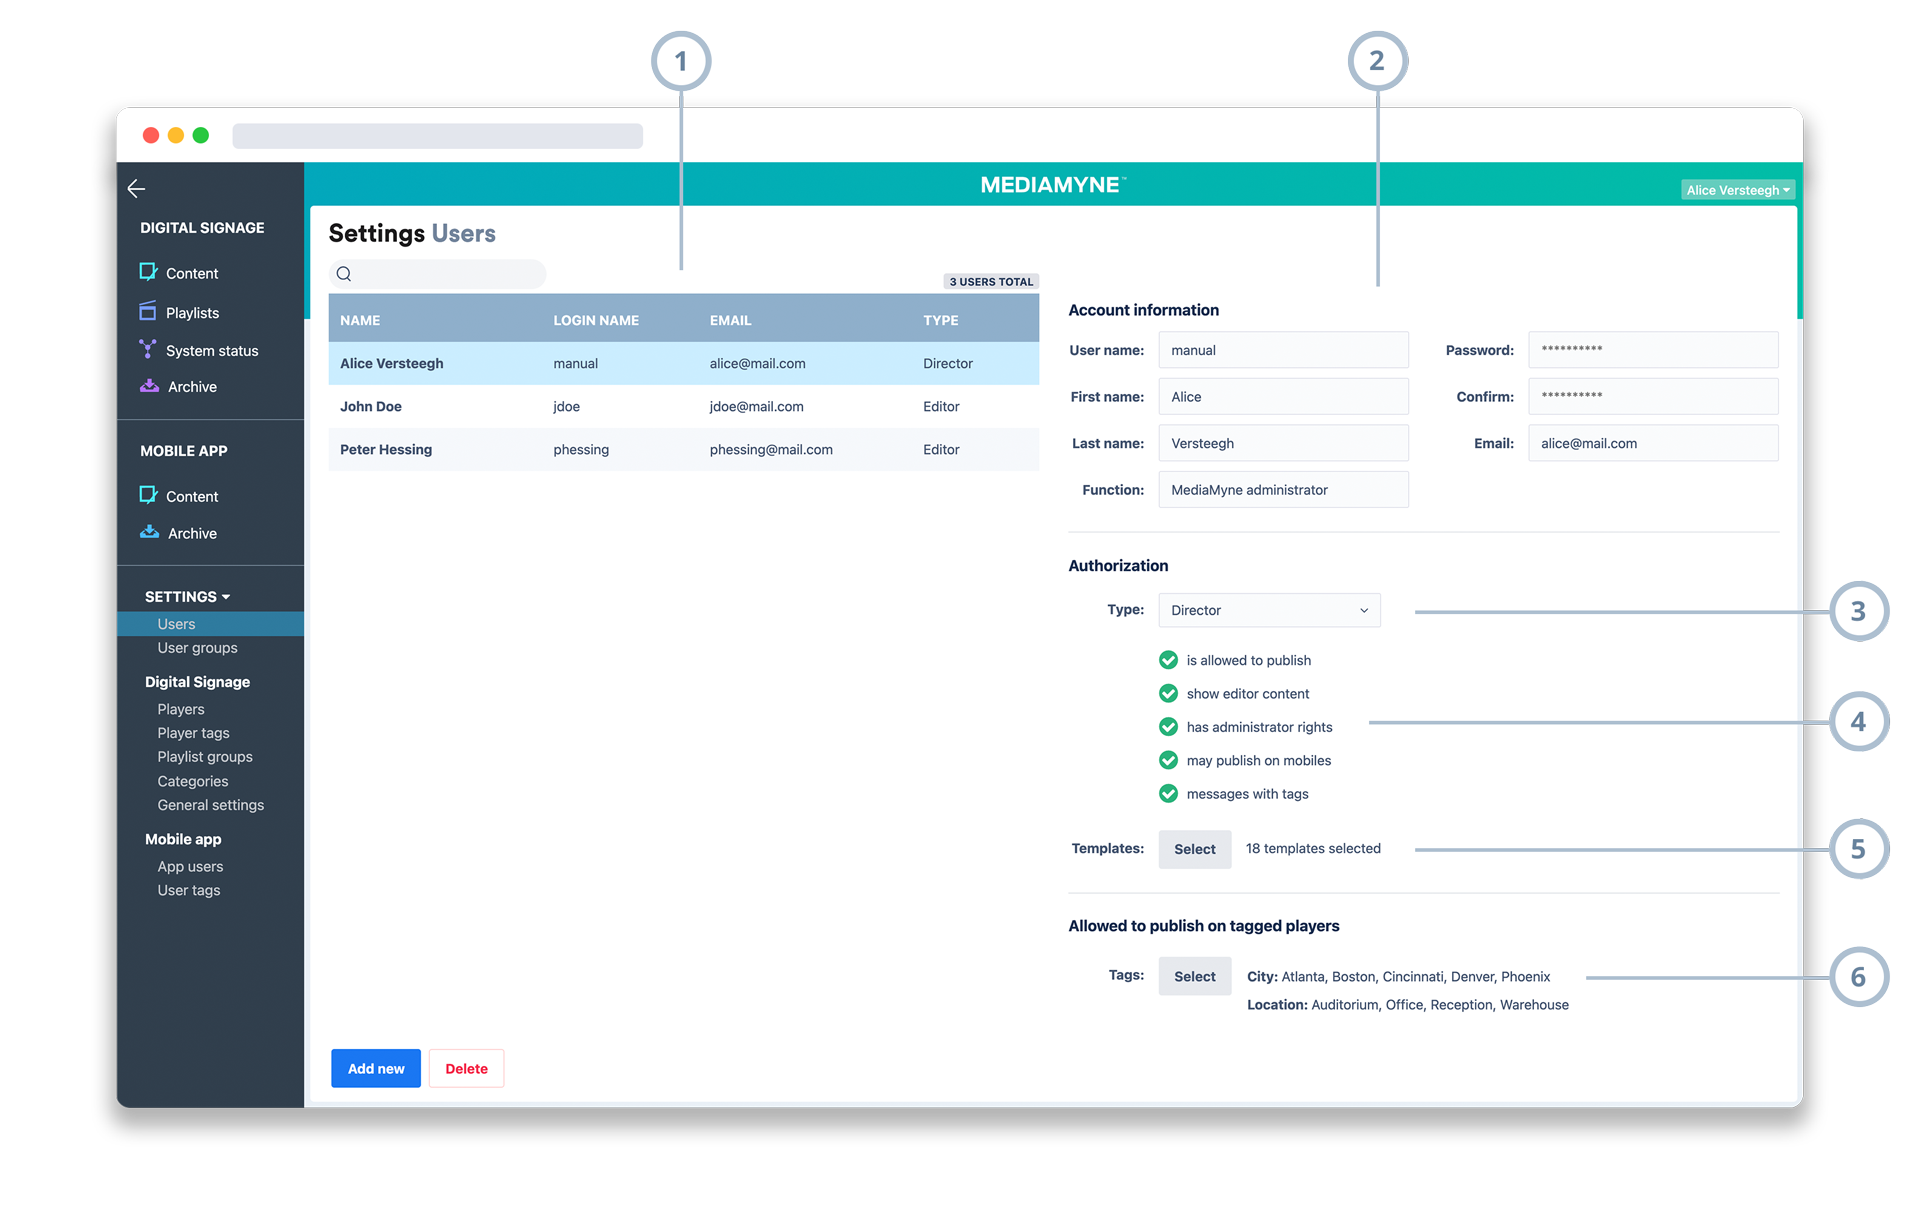
The settings are divided into three main parts: the first is the management of the CMS users, since this is the starting point of the usage of MediaMyne. The other two parts are dedicated to everything related to Digital Signage and MediaMyne mobile.

User types
A user type must be specified for each user. This could be a Director, an Editor or a Publisher. The user type determines the authorization of the user within the system, here below an overview of all user types.
Director
The Director is the main user of MediaMyne and the only type of user who can manage the playlists.
The Director is authorised to create messages, place them in self defined categories and to place these categories in the playlist. Also, the Director determines whether and where messages from Editors will be placed. Finally the Director is the only user type that can be authorised for administrator rights, so to have access to all these settings pages.
Editor
Editors are restricted users and can only create messages.
These messages are placed in fixed categories that were previously created in Settings > Categories. The Director determines whether these categories are placed in the playlist.
Editor in Chief
Editors in Chief have the exact same functionalities, but with the extra possibility to change assigned playlists.
The only playlists the Editor in Chief can edit are the ones that are connected to the authorised playlist groups in Settings > Users > Playlist group Editors in Chief are not able to add, delete or change the name of playlists, but only the contents of the authorised playlists. This means that the Editor in Chief can drag and drop any category available in the playlist, or even delete them from the playlist. From all editor categories available, only the categories the Editor in Chief is authorised for will be available. Editors in Chief are, contrary to Directors, not be able to change the ordering of slides within a category, the 'three-dots' button per category is not available to them.
Publisher
Publishers are capable to create categories with messages that will be displayed automatically, without being listed in the playlist. The messages will be ‘pushed’ between the existing categories and will be displayed with a certain frequency. This frequency can be defined in Settings > General Settings > Publication frequency. For example: if the frequency is set to ‘5’, a whole category from a publisher will be displayed after the fifth message in the playlist. This means that all messages in a category will be displayed at once. After this, 5 messages from the playlist will be shown again.
Choose the user type ‘Publisher’ with confidence about the exact purpose. Most of the digital signage networks will only operate with Directors and Editors. In case of doubt, please don’t hesitate to contact the MediaMyne team.
Adding users
Use the ‘Add new’ button on the left bottom to add a new user. The user details can be entered into the fields that will appear in the right pane 1. You can choose any login name, as long as it is not currently in use. The first- and last names will be visible as the author name in slides and messages.
Authorization
Depending on the type of user, additional settings can be done:
Is allowed to publish
Available for all user types
activates the publication checkbox in the message settings. If the checkbox is unchecked, messages will not be published until approval of another user. For example, this setting can be used for double checking content.
Show Editor Content
Only available for Directors
If checked, the Director will see all messages of all Editors in the message list.
Has administrator rights
Only available for Directors
Will give Directors access to all MediaMyne settings. In case there are more Directors, make sure not to give all of them this authorization as it provides access to all administration tasks and may cause conflicts.
May publish on mobiles
Available for all user types License required
Will give users access to the page to publish messages to the MediaMyne mobile app. A MediaMyne Mobile license is needed.
Messages with tags
Available for all user types
If checked, the user can use the player-filtering by tags in the player-selection dialog.
Templates
Available for all user types
Each customer account has a specific set of templates that can vary in numbers and types. Per user a sub-selection of the set can be selected, in the case a user has a specific task in MediaMyne. To make the setting, open the template-selection dialog and select or deselect the required templates.

💡 MediaMyne tip:
In some cases the range of available templates can be overwhelming and not functional. In the case of a user that, for example, only needs to add the daily menu for the restaurant will have sufficient possibilities with the menu-templates only. At the end it saves the user time for searching the right template.
Categories
Only available for Editors (in Chief)
Contrary to Directors, Editors can not make playlist-categories to save slides in, but can only select predefined categories. An Editor can be authorized for specific categories. Categories need to be created first in the setting 'Categories'.

The list of available Editor categories is not the same as the list of Director categories.
Group
Only available for Editors (in Chief)
If Editors can be defined as a group, like a department, it can be required that these users can have access to each others slides. By placing the users in a single usergroup, all users within this group will have all slides listed in the slides overview. Usergroups need to be created first in the setting 'Usergroups'.
User groups are made in the second menu item 'User groups', in this list the number of users per group is indicated.
A user can only exist in a single group.
Playlist group
Only available for Editors in Chief
Any playlist group selected here will authorise the Editor in Chief to be able to change all playlists which are connected to these groups. Learn more about connecting playlists in the Digital Signage page.
Player authorization
Available for all user types
All players are identified, or 'tagged' to authorize users to publish on the right players. So if a player is tagged in the city 'Atlanta' and location 'Office', the exact identified properties are clear in the system. Users can be authorized to publish on a certain set of tags, resulting in a certain list of players. In the example here below, the selection of all cities and only location 'warehouse' results in only two players. If in a later stage players are added in warehouses in Cincinnati, Denver or Phoenix, this user will automatically have access to these new players. Tags need to be created first in the setting 'Player tags'.

In this section all settings needed to start using MediaMyne for digital signage can be found, such as player management, player tags and categories.

Since MediaMyne works with fixed player licenses, the activation of new players, as well as the removing of existing players is executed by the MediaMyne Support team. If you have any questions regards MediaMyne's license system, please contact MediaMyne Support.
Player activation
When authorized and the 'Add new' button is available, an activation of a new player is straight forward. If a new installation of a player is done (more information on the installation page), a 9-digit code will appear on the screen, this is the unique activation code that must be entered in the code-inputfield 2. After entering the name, eventually a description, a player group and the right tagging, after saving this the player is activated instantly and will play the playlist as connected to the selected playlistgroup.
Playlist groups
Playlist groups give the Director the option to link a playlist to a group of players. There is also the possibility to display a playlist to multiple groups of players. These players are all assigned to the same group. The Director may assign a different playlist for each playlist- group at any time. Playlists are linked to playlist groups in the playlist page.
Categories
In this page the categories for Directors as well as for Editors can be managed. The Director categories can also be added and edited in the player selection dialog. In the user management page the Editor categories can be selected per Editor.
Mobile app settings
In this section all settings needed to start using MediaMyne for the mobile app can be found, such as app user management, for importing and inviting new app users.

If one or more users are selected with the checkfields on the left in the list, the button 'Invite selected users' appear on top of the list. This makes it possible to invite one or more app users to use the app. After the invitation, an email is sent to all recipients, explaining how they can further install and activate the app.
Users can have the following type of status:
active The user has activated the app on his or her mobile phone and can receive messages.
Invited The user is invited and has received an email to download the app and to activate.
New The user is only added in this overview, manually or by import, but has never been invited.
Inviting app users
When you have added all app users, manually or by import, you are ready to invite them by sending an automatic generated email with instructions to install and activate the app on their iPhone or Android phone.

Within the invitation dialog, a selection can be made to send the first invitation. If this is already done but the users has not activated yet and need a reminder, the second option can be chosen. The email is in terms of content exact the same, but the title of the email is indicating it is a reminder.

Importing users from file
It is possible to add app users manually, however, this can be a mind-numbing job if we talk about larger numbers. In this case the import from a file with all app users can be of help. By clicking the button 'Import users' the import dialog appears.

In this dialog some information is provided about the results of the previous import, such as the date and the number of new users added by this import. It is also indicated if any existing users were updated, this can be their job or department, but also if their name changed.
The import file
The format of the file is .CSV which can for instance be processed from MS Excel. This is also a format that can be generated automatically from a wide number of HR applications. For more information on this subject, please contact your HR application provider. The import file can be made in Google Sheets, Microsoft Excel, Apple Numbers or any other spreadsheet application that can export to CSV-files.
A user consist of a full name (first name + family name), email address, job-title, department and company. Hereunder an example:

Exporting the spreadsheet to a .CSV file should result in a file with the following markup:
John Doe; jdoe@mail.com; Marketeer; Marketing; Denver office
Anna Harris; aharris@mail.com; CEO; Management; Atlanta HQ
etc.
❗️CSV-files can have different ways of separation of the values. MediaMyne import will only accept semicolon (;) separations. If the spreadsheet application is not able to do so, a manual 'search and replace' on the exported file will be the solution.
If a user already exist in MediaMyne, but is imported again, only changes in the users name or job etc. will be updated. MediaMyne uses the email address as the key of a user, so any changes in the email address will generate a new user.
Importing user tags
Users can be tagged by their job, department or company. These are fixed types, but the values can be set per account. If a user is imported and the tag-value, for example Job, does not exist yet in MediaMyne, the value will automatically be added to the system. If it does exist already, the users job will be tagged to the existing value already known by the system.
App users can be added and updated by the import. To reduce the risk of accidentally deleting a large number of users, MediaMyne does not allow to delete users by the import. This will remain a manual action.